Want to Improve The Air Quality In Your Home? Don’t Forget the Laundry Room!
When was the last time you cleaned your laundry room? Can you remember the last time you moved the washer and dryer and swept and vacuumed the floor behind them? How about the last time you vacuumed inside the dryer vent pipe? Be honest! Never? You’re not alone.
I see it all the time. Most people are great about cleaning their kitchens, bathrooms, and bedrooms. But the laundry room? This small, out-of-the-way space gets almost no attention. But if you want healthy air inside your home, then you to give a little love to your laundry room too. Don’t worry; you don’t have to do it often, but at least once every few months.
Lint and dust buildup
I generally see a significant build-up of dust, dander, pet hair, lent, and other debris when I’m inspecting the air quality of people’s homes. The laundry room is easy to ignore since we don’t spend a lot of time there, and we can just close the door and forget about it. But what I have seen over and over again is that the areas behind the washer and dryer will build up dust and debris for years. You might even know there’s a sock (or three!) back there, but you just don’t want to deal with the hassle of moving the big, bulky appliance. Well, it’s probably time you set aside a few minutes and did it.
For one, that excess lent build-up is a serious fire hazard, so that needs to be dealt with ASAP. Secondly, the dust mites, dander, pet hair, etc., will contribute to contaminated air inside the rest of your home. This can contribute to allergies, respiratory issues, sinus issues, and other not-so-pleasant symptoms. While this space is easy to ignore, it’s still INSIDE YOUR HOME! You need to clean up that debris to make sure everyone in the house is breathing easy.
So, the next time you get that vacuum out, plan a few extra minutes to follow these steps:
- First, sweep and vacuum up any areas you can see. If you have a hose attachment, get around the baseboards and corners – if not, sweep those areas with a broom.
- Next, move the washer and dryer out from the walls. (Get help if you need it; do not pull a muscle to do this!) For safety, it’s a good idea to unplug the washer and dryer at this point. If your dryer runs on natural gas, you need to consult with a professional or your gas company to make sure you properly turn off the gas. You may have a short gas hose that prevents you from moving the dryer very far. If that’s your situation, don’t push it! You don’t want to disturb the connection and cause a gas leak. Call in a professional.
- Next, you’re going to have shimmy back behind the appliances to sweep and vacuum. Again- don’t forget the baseboards and corners.
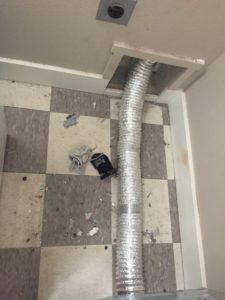
- Once the floor is all cleaned up, you need to unscrew or untape the dryer vent pipe connection from the duct that is venting to the outside. Often times, dryer vent pipe is already loose to begin with, and it just comes right off with a tug. Either way, detach the dryer vent from the outside and use your vacuum hose attachment to vacuum out the lint and dust that has built up inside the pipe. If you don’t have a hose attachment, or you can’t reach inside the pipe, you may need to purchase a dryer vent cleaning kit. This kit will give you the tools to get into the pipe and remove all that debris. You can get them for under $20 at the local hardware store.
- Once you’ve cleaned out the pipe, make sure to remove any debris you can see in the duct. Sometimes the ductwork may extend a far distance from the laundry room to the outside of the house. If that’s your case, you probably want to call a duct-cleaning professional and have them take care of this for you. I recommend having the ducts cleaned every 2-3 years. Make sure they clean the dryer vent at this time.
- After you’ve cleaned everything up, make sure you reattach everything. This is a great opportunity to make sure that your dryer vent pipe is well attached to the duct and sealed properly. If you have a clamp, make sure the screw is tight. If you have tape, make sure there is a good solid seal all the way around. You don’t want the dryer exhaust to come back into your house – I see this often! Ensure a good tight seal to avoid this.
And that’s all there is to it. It’s a lot easier than it may sound. You’re basically just cleaning the space as you would anywhere else in your home. You just have the extra step of cleaning out the vent pipe, which is really no big deal. If you’re hesitant for any reason or have an exceptionally awkward space, don’t hesitate to call in a professional or a friend for help.
Once you’re all done, you’ll experience cleaner air, more efficient dryer performance, which means faster drying times and reduced electricity usage, and peace of mind! Like I mentioned above, I recommend sweeping and vacuuming this space once every couple of months. You should try to clean the dryer vent once a year, or if you have to call a professional for this, once every 2-3 years when you get your ducts cleaned. (More often is better.) And don’t forget, the best way to improve the air quality of your home is to OPEN WINDOWS!! Ventilation is a good thing!
Concerned about the air quality inside your home? Call us today for a free 20 minute consultation. We’ll answer whatever questions you may have and help you identify next steps. You deserve a healthy home!


Cathy Cooke, BCHN, BBEC Holistic Nutritionist and Building Biologist is the founder of Whole Home and Body Health which provides EMF Assessments, Mold Testing, and Nutrition and Health Consulting located in Boise, Idaho. Cathy is available for consulting via skype and phone, and is also willing to travel as needed for home assessments. Schedule an appointment today!
Recent Comments